 |
 |
 |
 |
 |
 |
 |
|
Check out our web directory of the UK
roofing and cladding industry
www.roofinfo.co.uk |
Sign up for our monthly news letter. |
|
|
|

Ridge construction part 3 looks at ridge
fittings and accessories.
Fittings and accessories
Fittings are items like ridge tiles that are made in the same
material as the roof tiles. Accessories are made of plastic, metal or
another material that make up a system such as dry-fix or ventilation
components at the ridge, or ridge terminals. In some instances fittings
and accessories are fixed together, while on others they are not. The
compatibility of fittings with accessories varies enormously, even when
they are sold as universal products, and should be checked with the
manufacturer of both components that are being put together. The
ultimate responsibility for their compatibility is the specifier.
Ridge fixings
Ridges that are not mortar-bedded must be secured against wind uplift by
some other means. For ridge tiles this means nails, screws, straps or
clips that are secured to a ridge board, secure ridge batten or a patent
edge channel. Most clay and concrete ridge tiles are secured along the
centre line of the ridge directly above the apex of the roof, either
through the ridge tiles or through the joints between the ridge tiles
with plates or straps. Fibre cement ridge tiles tend to be screwed along
the outside edges into the top battens on each roof slope. This works
well provided there is no flexing or movement in the roof structure,
which can result in the ridge tiles cracking along the apex. This can be
partially compensated for by drilling oversized holes for the screws.
But as the amount of movement only becomes evident after a few years it
is easy to get wrong.
Metal ridge systems, such as preformed zinc and lead
rolls, rely upon being nailed to a ridge batten of the correct height
and size. In exposed locations galvanized metal straps positioned on the
laps, and screwed into the batten below, may be needed.
The number and spacing of the nails, screws, clips or
straps will depend upon the system being used. Ridge tiles up to 500mm
long will require at least two annular ring shank nails (minimum 3.7mm
diameter), and penetrating the ridge batten by a minimum of 35mm, or one
screw 5mm diameter (no 10) penetrating the ridge batten by a minimum of
35mm. Smooth nails are not suitable as the grip of the nail into the
timber is insufficient to prevent them withdrawing.
For longer ridge systems, or when using proprietary
clips, the manufacturer should supply recommendations and fixing
instructions.
Ridge battens
What the ridge tiles are fixed to must be sufficiently strong, and
securely fixed to transfer the wind uplift loads back into the roof
structure. Therefore, the ridge batten should be at least 38mm deep and
11 times wider than the nail diameter, or seven times the screw
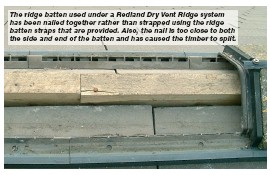
diameter. The screws or nails should be fixed as close to the centre of
the batten as possible, as a nail close to the edge can cause the timber
to split. The recommended distances quoted in BS 5268 part 2 are: five
times the diameter of the nail in from the edge of the timber and 20
times the diameter in from the end of the batten.
Nails require ever-increasing impact loads to drive
them into the timber, which will try to deflect the impact load.
Therefore, the ridge batten needs to be as rigid as possible. Laminating
three or four layers of tile batten together is insufficient if there is
no ridge board underneath it, as the individual pieces of timber will
act like a leaf spring spanning between the trussed rafters. If the
batten deflects under the nail-driving impact load, it is possible to
reach a point where you cannot continue to drive the nail into the
timber as greater impact loads just cause the ridge batten to deflect
more and more. As the ridge batten deflects it causes the nail head to
go down relative to the ridge tiles, and come back up again and remain
slack.When screws are being installed they require an ever-increasing
turning load which is pulling the ridge batten up – taking slack out of
it. |
 |
|
Therefore, it is possible to use a smaller
section of timber as a ridge batten as deflection is not an issue. Also
the screw can always be pulled down onto the ridge tile or plate without
leaving it slack. Sections of ridge batten may have to be removed to
allow pipes or flues to connect to ridge ventilation terminals or flues.
They should not occur in adjacent rafter spacings, as the ridge batten
must be secured to at least two rafters.
Ridge batten fixings
The fixing of the ridge batten to the timber or metal roof structure is
also critical, and it is important that the extreme forces at the ridge
do not pull the fixing out. A ridge board with additional battens fixed
above it, to give it additional height, should be fixed using ridge
batten straps or a long screw at 600mm centres (maximum) to hold them
together. Skew nailing into the ridge board is also possible if the
ridge board is wide enough to hold the nails, but on older roofs this
may not be appropriate.
With trussed rafters it is not possible to nail into
the apex of the truss as this is a dry-mitred joint and will not hold a
fixing. To prevent the timber splitting, the nail or screw fixing needs
to be at least 20 times the diameter of the nail fixing away from the
apex. Nails perform much better in shear than withdrawal, so where
possible the nail should be driven in at right angles to the vertical
upward pull of the ridge under wind load.
If ridge batten straps are being used they should be
either twisted and nailed to the face of the trussed rafter, or bent
down the top face of the rafter under the top batten position. It is
essential to drive an annular ring shank nail, or a screw, into the top
of the rafter through the fold in the ridge batten strap to take all the
slack out of the strap fixing.
Over a year the timber (or steel) roof will move with
thermal and moisture expansion and contraction. This can cause the ridge
of a domestic roof to rise and fall approximately 40mm. This movement
can pull a bent strap straight and result in the ridge batten rising off
the apex of the trussed rafter. This can produce what is known as
‘rising nail syndrome’, which only happens at the ridge.
Weather resistance
The position of waterproofing membrane under the ridge tiles, or the
ridge to ridge seals, and skirts between the ridge tiles and the roof
tile/slates, will vary, and the fixing instructions should always be
followed. The majority of waterproof membranes should be installed over
the ridge batten to protect it. With systems without a waterproof
membrane the ridge batten does not need additional protection. Skirts
and waterproofing membranes should be long enough to lap the head of the
roof tiles and slates on each roof slope by a minimum of 75mm to protect
the head nail holes. This may be difficult for deep profile tiles such
as clay pantiles or unders and overs, and may require the skirt material
to be able to stretch up to three times its original width, and
one-and-a-half times its length. The steeper the rafter pitch, the
narrower and deeper the corrugation, the more critical the skirt
material stretch will be.
Tips
- Install any ridge battens before
installing the top tile/slate battens.
- Nailed ridge tiles should be fixed
to a solid timber, rather than laminated tile battens, onto timber
trussed rafters.
- Ridge battens should be strapped
down with no slack to trussed rafters to prevent slack nails at a
later date.
|
| Compiled
by Chris Thomas, The Tiled Roofing Consultancy, 2 Ridlands Grove,
Limpsfield Chart, Oxted, Surrey, RH8 0ST, tel 01883 724774 |
|