 |
 |
 |
 |
 |
 |
 |
|
Check out our web directory of the UK
roofing and cladding industry
www.roofinfo.co.uk |
Sign up for our monthly news letter. |
|
|
|

All roof tilers know how to install ridge
tiles using mortar bedding, and because the technique has been passed on
from one generation to the next few can tell you why they do it that
way.
But when it comes to other forms of ridge tile fixing,
the recommendations are often not followed. If we look at the what, the
where, and the how, it is possible to understand why mortar bedding is
so popular and why it works.
Definitions
We need too start with some obvious statements that will help us
define what a ridge is. A ridge is the horizontal junction between two
roof slopes (duo ridge), or a roof slope and a vertical wall below a
roof slope, (mono ridge). If the roof junction is inclined, then it is
not a ridge, it is a hip or valley. A ridge (along with a top edge
abutment) should be the highest point of any roof slope, making it more
exposed than most other parts of a roof. A ridge is also one of the last
parts of the roof to be completed, making access to it often difficult.
Sizes and pitches
A ridge is normally formed of ridge tiles that are curved or angled,
and bridges the gap between the two roof slopes. To maintain a
weather-tight joint the ridge tiles should lap the head of roof tiles,
or slates, on each roof slope by a minimum of 75mm. To do this the width
of a ridge tile needs to be in excess of 150mm.
As it is almost impossible to mitre cut the head of the
top course of tiles to fit under a 150mm wide ridge tile, and because
the gap between the top course of tiles will vary with rafter pitch and
height of tile corrugation, ridge tiles are made to widths between 215mm
and 340mm, depending upon shape, material and manufacturer. In most
instances concrete and clay ridge tiles are available in two lengths –
450mm and 300mm – while continental clay tile manufacturers have lengths
from 330mm to 500mm, and fibre cement tiles are available up to 900mm
long.
Generally, the rafter pitch on each side of the ridge
of most buildings is the same. In reality they can vary from vertical to
12.5° on either side. With half-round, and some designs of angled ridge
tiles, it is possible to accommodate a wide range of rafter pitches from
12.5° to 45°.
If the roof slopes on both sides are steeper than 45°,
most halfround ridge tiles will not be wide enough. With angled ridges,
the angle should match as close as possible the true pitch of the tiles
on each roof slope. In most instances the length of each wing remains
the same, only the angle between them changes. Angles from 75° to 135°,
in 10° and 15° degree increments, are usually available.
To determine the angle of ridge needed, the following
procedure should be followed. Add together the rafter pitch of each roof
slope and take the result away from 180° (the sum of the angles of a
triangle). The result will give you the angle of the roof structure at
the apex. Add to this the angle difference between the roof tile and the
rafter pitch for each roof-slope (about 10° for plain tiles, 5° for
interlocking tiles, and 3.5° for slates). The resulting figure will be
the true dihedral angle between the top surfaces of the roof tiles or
slates at the ridge. Choose the nearest size ridge angle that is smaller
than your calculated dihedral angle (for 97° choose a 90 degree angle
ridge). If you choose a larger angle the outer edges will not touch the
tile surface and will give a thicker mortar bed appearance, while with a
smaller angle the outer edges will make contact with the tiles and hide
the majority of the mortar bedding.
Shapes
While half-round ridge tiles are the most popular shape, especially
for plain tiles and profiled interlocking tiles, angled ridge tiles are
popular with flat interlocking tiles and slates. ‘Hogs Back’ is a cross
between angled and half round – they were popular with clay plain tiles
but less popular now. Universal angle ridge tiles are a concrete angled
ridge tile with a short vertical up-stand along the edge to allow it to
be used with a variety of rafter pitches, as the name suggests. |
 |
On the continent clay ridge tiles are
generally half-round or angled but with a flat top or a central rib,
often a reflection of the roof tile profile.
Capped angle and capped halfround ridge tiles are
another alternative. The cap is a raised section at one end that laps
onto the end of the next ridge tile, to protect the butt joint. These
should be jointed with mortar unless used with a dry-fix ridge system.
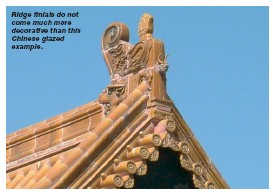
Half-round and angled ridge tiles are also available in
ornamental patterns, with rolls and crests along the apex, or finials at
one end. These are normally made of clay but can be found in a limited
range in concrete. Some ornamental ridge tiles are made in one piece,
while others are made in two or more pieces. Similarly, most decorative
finials are made in one piece, while others are bolted to a normal ridge
tile or block end.
Mono ridge tiles are generally available for both half-round
and angled ridge situation. The vertical leg of the mono ridge should be
long enough to cover the ends of the construction and provide a suitable
screw fixing onto a timber barge board or similar structure on the
vertical face.
Ridge accessories and fittings
There is also a range of fittings available for the ridge. Block
ends are vertical caps to the end ridge tiles that close off the ridge
to prevent birds entering the ridge. These are usually used with dry
ridge and dry verge systems. The block ends can be separate plastic
units or a complete end ridge tile unit. Dentil slips are narrow widths
of plain tile, or similar material, that are used to thin out mortar
bedding where profiled tiles have a deep corrugation. Thirdly, terminals
for gas flues and ventilators for mechanical extracts or soil pipes are
available for most ridge shapes. These terminals are ridge tiles with a
rectangular duct passing up through the centre section. The terminal
grill assembly is generally plastic for a ventilator and clay or
concrete for a gas flue as it needs to be non-combustible.
To achieve a continuous ridgelevel roof-space
ventilation system there are dry ventilated ridge systems that have
grills along the leading edge of the ridge tiles, and ridge-to-ridge
seals with mechanical fixings between the ridge tiles, that eliminate
the need to mortar-bed the ridge tiles. For very exposed locations, and
where there is a lot of roof structure movement, dry-fix ridge systems
are also available with no ventilation. Some are similar to the dry vent
systems, and some are very different relying on a waterproof membrane
under the ridge tiles to protect the roof structure below.
Lightening conductors are often installed along the
ridge line, either under the ridge tiles with externally exposed strike
plates, or along the side of the ridge on slate straps. Whichever system
is used it should be integrated into the ridge during construction, as
the location of the straps, plates and tape must not interfere, or
weaken, the ridge installation.
Tips
- Try to select all ridge components
from the roof tile manufacturer to ensure compatibility.
- Check that the ridge tile and
components are all suitable for the rafter pitches on each roof
slope.
- Set the top tiles/slates as close to
the apex of the roof as possible to achieve at least 75mm of lap
between the ridge tiles and the top tiles/slates.
Ridge construction part 2 will deal with
the installation of the ridge components. |
| Compiled
by Chris Thomas, The Tiled Roofing Consultancy, 2 Ridlands Grove,
Limpsfield Chart, Oxted, Surrey, RH8 0ST, tel 01883 724774 |
|