 |
 |
 |
 |
 |
 |
 |
|
Check out our web directory of the UK
roofing and cladding industry
www.roofinfo.co.uk |
Sign up for our monthly news letter. |
|
|
|

Plain tiles in one form or another have been with us since before the
14th Century. We know this, because a tax was levied on roof tiles. To
ensure that the tax was levied evenly and correctly an Act of Parliament
decreed that all plain tiles were made to a uniform size: 10.5 by 6.5
inches. The Act has long since been repealed, but the size has remained
constant, only adjusted slightly to 265 by 165mm in the mid 1970s.
Similarly, the method of laying them has changed surprisingly little.Battens
Most plain tiles now have nibs and are hung on straight timber
battens. In days of old the battens would have been split to produce a
reasonably straight and level surface for the tiles to lie on. As many
tiles did not have nibs they were held in place with square oak pegs,
pushed through what we now call nail holes. The pegs form the nib and
rested on the top surface of the batten, so they were not nail-fixed to
the battens. If the tiles were used in an exposed location they were
probably nailed into the battens, but this was not a common practice.
The original handmade plain clay tiles
varied in shape, twist, camber and surface texture, and therefore needed
to be sorted to get a reasonable fit. Tiles tended to be pegged once, as
it was difficult to get both pegs to rest on an uneven batten surface.
After the second world war, due to a
shotage of timber, 25 by 25mm sawn battens were used where the rafters
were at 400mm centres. Often, the battens split when nailed.
Some roofs were fully boarded, either with
feather edge boards or rough sawn boards, whereby the tiles were
directly nailed into the boarding with iron nails. This was a better
practice, if the boards were thick enough.
Since that time, the consistency of the
tiles that are produced has improved to the point that we almost expect
every tile to be perfectly identical; unfortunately we have not yet
reached that point in manufacturing. We have sawn battens that are as
straight as we can get and the tiles are fixed with non ferrous nails of
an amazing accuracy.
One thing that has not changed is the order
in which the tiles are laid. It may seem obvious to start at the bottom
and finish at the top, but there are many routes between the two.
Horizontal bands
The first method is to lay the tiles in horizontal bands that
regulates the nailing of tiles on a specified course; the tiles are laid
and then every tile is twice nailed on the given row before continuing
up the roof. Once you get about ten courses up the roof slope the tiler
either needs to stand on the battens above the tiles he is fixing or on
the tiles he has just laid; neither is ideal.
Diagonal bands
The second method is to lay the tiles in diagonal bands. This makes
horizontal course nailing a little more difficult - on each diagonal
line of tiles the tiles must be nailed as the tiles are laid, otherwise
one nail hole will be covered over by the tile above, and it is easy to
forget which are the nailed courses. Diagonal band laying works well
with roofs with hips and valleys as the tiling can be laid from the
valley to the hip in parallel bands. Also the tiler can stand on the
battens to the side of the line of tiles he is laying. With this method
it is common to find that some tiles are only once nailed, if at
all.
Vertical bands
The third method is to lay tiles in vertical bands. This method
allows the tiler to stand at the side of the tiles he is laying,
especially on steep gable to gable roofs. But can lead to a roof with
visible vertical stripes, unless the tiles are well-mixed beforehand.
The fixing of the tiles in regular courses is easy with this method.
Mixing
Regardless of the type of tiles, clay or concrete, single, cross or
double camber, hand or machinemade, the tiles should always be mixed
from three pallets.
|
 |
If
the tiles are strap-banded into packs these should be split and mixed once
up on the roof. Provided all the tiles are the same, the need to mix may
be unimportant, but where there is no certainty that all the
tiles are from the same production run or kiln, it is essential to mix
the tiles to distribute the colours, shapes and textures to prevent
patchiness. In some instances it may be correct to reject certain tiles
altogether.
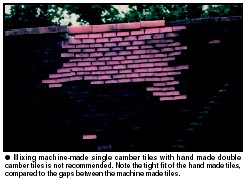
While this may appear to be extravagant, in
reality there are normally always some tiles left over at the end of any
roof. It is never a good idea to mix plain tiles of a different material
or from a different manufacture as they may well never blend in with the
surrounding tiles, however much mixing is undertaken.
All plain tiles may look the same and they are
regulated under British Standards, but there are differences in
thickness, hanging length, width, length, camber, colour and texture.
Appearance
With machine-made tiles it is expected that they will align along
the leading edge to give a clearly defined line, especially with single
camber tiles. With all tiles, especially handmade and double camber
tiles, there will be a variation in the hanging length of the tiles,
which produces a much softer and varied appearance of the leading edges.
It is important that the hard and soft appearances are not mixed up in
the mind of the specifier, otherwise there could be some
misunderstanding, and client dissatisfaction with the finished roof.
Fixings
For plain tiles, the British Standard 5534: 2003 states in clause
5.5.3.4.2: "Where nailed, plain tiles should have at least the
following fixings:
- for nibless tiles, two nails should be
used to every tile
- for nibbed tiles, for rafter pitches
below 60o, two nails should be used in each tile in at least
every fifth course. For rafter pitches of 60o and above,
two nails should be used in every tile
- at verges and abutments, and at each
side of valleys and hips, the end tile in every course should be
twice nailed where possible, or mechanically fixed
- at eaves and top edges, two courses of
tiles should be nailed or otherwise mechanically fixed."
As this is the minimum fixing for the
least exposed locations in the UK, more tile fixing will be needed for
more exposed locations. To determine the actual fixing specification
required a set of calculations will be needed. It is not acceptable
under any circumstances to undertake nailing at greater than fifth
course and only once nailing a tile can in some instances reduce the
wind uplift resistance by 50 percent, and is therefore an unwise
practice.
Conclusion
- Tiles should always be mixed ideally
from three pallets at any one time, to help prevent a patchy
appearance
- The chosen method of laying the tiles
should be safe for the pitch and shape of the roof
- The required fixing specification
should always be maintained using two nails per tile.
|
| Compiled by Chris Thomas, The Tiled
Roofing Consultancy, 2 Ridlands Grove, Limpsfield Chart, Oxted, Surrey,
RH8 0ST, tel 01883 724774 |
|