 |
 |
 |
 |
 |
 |
 |
|
Check out our web directory of the UK
roofing and cladding industry
www.roofinfo.co.uk |
Sign up for our monthly news letter. |
|
|
|
|
|

The most vulnerable part of any inclined valley is where it discharges
into the eaves gutter. This is equally true for GRP valley troughs, which
are the tilerís preferred valley liner due to ease of installation and
relative cost.
Unlike lead, GRP (glass reinforced
polyester) cannot be stretched or bent into shape. Whilst it can be bent a
little along its length (down the centre line), it is more difficult to
bend across its width, due to its general ĎVí shape. The ability to be
bent along its length is to allow the trough to fit a limited range of
roof pitches. The steeper the rafter pitch, the smaller the angle across
the valley (dihedral angle). If the valley trough is bent across its width
it is likely to stress or damage the corrugations that form the edge of
the trough. The corrugations provide rigidity to help it resist wind
uplift forces, once it is nailed into position. They also form channels to
take away water that may penetrate the mortar bedding, which is not 100
percent waterproof.
The rainwater flowing off the tiles into
the valley is added to that already flowing down the valley. This
continues until the maximum volume of water is reached at the bottom of
the valley, just before it discharges into the gutter, or back onto the
roof in the case of a dormer. At the point of maximum flow it is essential
that nothing obstructs the discharge of water. A reduction of the true
valley pitch will cause the water flow to slow down or develop turbulence.
This will act as a restriction to the water flow, which will in turn,
cause the water to back up the valley and spill out over the adjacent
tiles. |

|
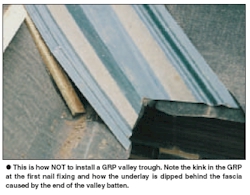
| Placing the valley trough directly onto the top of the fascia board will
reduce the true valley pitch, as the height of the fascia is generally
about 50mm above the rafter level. This will also cause the outer
corrugations of the trough to kick up the eaves tiles on either side of
the valley by between 19 and 25mm. Whilst this looks less than
professional, it also reduces the weatherability of the roof covering by
creating gapping between the tiles.
To prevent this happening, the fascia board
should be cut down by at least the height of the GRP trough corrugations
(25mm) for the full width of the valley; this is to allow water in the
side channels to discharge into the gutters. If the fascia is cut down by
more than 25mm it will affect the position of the guttering, which in turn
could allow water flowing of the roof to discharge over the gutters.
Cutting down the height of the fascia board
should be the responsibility of the carpenter but it is inevitably left to
the tiler to do. Whilst this is more work for the tiler, installing a GRP
valley is a far simpler operation than forming a lead valley. Provided the
GRP valley is installed correctly the life expectancy of the roof should
not be compromised.
|
| Compiled by Chris Thomas, The Tiled
Roofing Consultancy, 2 Ridlands Grove, Limpsfield Chart, Oxted, Surrey,
RH8 0ST, tel 01883 724774. |
|