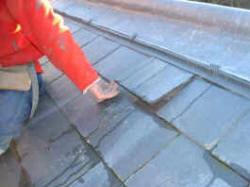
| Whilst it can be proven that the centre nail
fixing of double lap slates is a very efficient method of fixing slates to
resist the most severe wind conditions, it is impossible to centre nail
the top row of slates. The inappropriate detailing of the top slate fixing
is the most common problem found on a slate roof. |
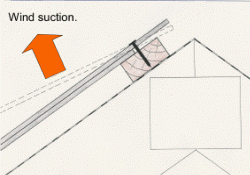
| In previous articles we have looked at the effect wind suction has on
the exposed section of the slate and how the top of the slate stops the
slate rotating about the nail fixings in the middle. But with top slates,
they are cut short to weather the laps in the lower slate course.
Therefore the nail fixings which are the same location relative to the
bottom of the slate, are now very close to the top of the top slate. This
makes the slates very vulnerable to rotation, as there is little or no
resistance to the wind suction. |
 |
|
Uplift rotation |
| The reason the slates are so vulnerable relates to the fact that the
head of the lower slate rests on the same batten that the top slate is
nailed too. Therefore the top slate is laying in contact with the head of
the slate below and the nails are passing through the top slate, down the
top edge of the lower slate before penetrating the timber batten. This
means that below the top slate on the down side of the nail is the lower
slate and on the up side of the nail is fresh air. |
 |
|
Therefore if the wind sucks the top slate up, the slate can rotate about the
head of the lower slate/the nail fixings, until the upper part of the slate
comes into contact with the top of the batten. |
| This situation is far from ideal, as in reality
the weight of a ridge tile or top edge flashing could cause the same
rotation of the top slate by their self-weight. Also the wind uplift force
is likely to use the slate as a lever to lift the ridge tile up and crack
the mortar bedding. |
| To overcome this situation, one of four details
should be adopted: - |
|
Double top batten |
| The double top batten detail requires a second thicker batten to be
nailed against the head of the top batten. The top slate is cut some
50-75mm above the nail holes and nailed into the smaller top batten. The
head of the slate rests on the larger second batten, preventing the slate
from rotating. The additional height of the second batten should be equal
or slightly greater than the nominal thickness of the top course of
slates. . |
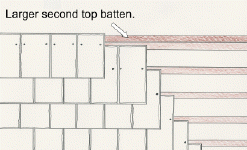 |
| It is common to see a 32x25mm tile batten turned on edge for
the second batten, or a standard batten with an additional 6mm lath nailed
to it, with a 6mm thick natural slate. If the second batten is smaller
than the combined thickness of the batten plus the slate thickness, the
top slate will still be able to rotate |
|
Shouldered slates |
| The shouldered slate detail involves setting the top batten 25-30mm
lower than the normal batten gauge, such that the second course of slates
down from the ridge totally covers the batten. The top course of the
slates should be shouldered to expose the full depth of the battens. This
is to allow the top course of slates to be nailed to the top batten with
two nails closer to the middle, without compromising the head of the lower
course of slates resting on the top batten. |
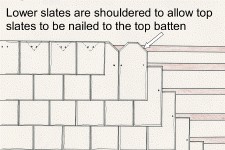 |
| The top of the top slates in now resting fully on the top of
the lower course of slates and restricted from rotating. |
|
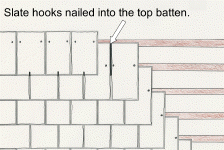
Slate hooks |
| The slate hook detail involves using slate hooks nailed into
the top batten as well as double nailing the top slates. To ensure that
the slate hooks sit correctly and do not shunt the side laps of the lower
course of slates, one edge of each slate should be trimmed back by the
thickness of, and for the length of, the slate hook. |
 |
|
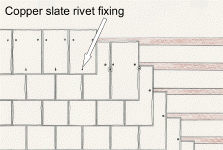
Tail rivets |
| The use of copper tail rivets requires a rivet hole to be
punched in the leading edge of the slate 50mm up and coinciding with the
joint between the lower slates. Having located the copper disc rivet in
the lower joint and through the hole in the top slate. The top slate can
be nailed in the normal way and the rivet should be folded to hold the
leading edge of the top slate down. |
 |
|
Conclusion |
| Of the three details the double batten detail
is the simplest and most secure, but does require additional timber
battens, or a suitable sized packing lath. The shouldered slate detail
requires cutting of the top corners of the lower slates and fresh nail
holes in the top slate closer to the centre of the slate. This detail
requires less material and more site work. The slate hook fixing detail is
the least secure and the hooks will be visible. This detail will require
additional slate hooks and trimming of the lower slates. However slate
hooks can be very affective if the slates are less rigid, as with some
imported slate, reclaimed slate or some resin slates. The use of tail
rivets for the top slates is a common detail with Fibre Cement slates,
where all the slates are held down with tail rivets, making their
visibility less of an issue.
Depending upon the double lap slate material used, the choice is yours. |